
How to Register as a Student and Use the Online Testing Dashboard on Exam Master AI Portal
How to Register as a Student and Use the Online Testing Dashboard on Exam Master AI Portal
How to Register as a Student and Use the Online Testing Dashboard on Exam Master AI Portal. Step-by-step guide for students to register, log in, and navigate the online testing control panel on Exam Master AI. Learn how to access quizzes, mock exams, and online assessments easily!

In our previous comprehensive guide, we detailed how school administrators and teachers can harness the power of Exam Master AI to generate highly targeted, bilingual exam papers within seconds. However, the portal isn’t just a lifesaver for educators—it features an advanced, fully interactive Online Testing Portal designed specifically for students to attempt quizzes, practice tests, and track their academic performance online.
If you are a student looking to register your account for the first time, or a teacher wanting to guide your class through the online examination process, this deep-dive tutorial will cover every technical step required to set up a student profile and navigate the testing engine control panel.
Table of Contents
- Finding the Exam Master AI Secure Access Portal
- Step-by-Step Student Account Registration
- Overcoming Login Challenges: Accessing the Dashboard
- Understanding the Student Dashboard: Why It Resembles the Teacher Layout
- Introduction to the Online Testing Control Panel
- Summary & Upcoming Modules
1. Finding the Exam Master AI Secure Access Portal
The very first step is safely navigating to the portal interface. Follow these directions carefully:
- Open your web browser (such as Google Chrome) and type exammasterai.com into the address bar or search bar.
- Click on the very first official link that appears in the Google search results.
- Once the main homepage loads, locate the top navigation bar and click on the “Online Testing” menu item.
- The system will perform a quick secure browser check and then automatically redirect you to the Secure Access Portal (
portal.exammasterai.com).
2. Step-by-Step Student Account Registration
When you land on the secure portal page, the default view is tailored for teacher access. To set up a student account, you must follow this exact layout protocol:
- Toggle Account Type: Click on the “STUDENT” tab located right next to the Teacher and Admin buttons.
- Initiate Registration: Since you don’t have an active profile yet, ignore the credentials box and click on the blue “Register Now” link at the bottom.
- Select Student Type: In the dropdown menu, select your student category. For regular academic studies, choose “School Students”.
- Upload Profile Photo: The interface gives you two options—you can activate your webcam by clicking “Camera” to capture a live photo, or click “Upload” to select a pre-saved profile image from your computer or smartphone storage.
- Fill in Personal Details: Proceed down the form to fill in your essential academic records:
- Full Name: Type your complete legal name (e.g., Muhammad Muddassir).
- Email Address: Input a valid email string (e.g.,
alistd123@gmail.com). - Secure Password: Create a strong password to protect your test records.
- Select Class/Grade: Click the dropdown to pick your current class (supporting options from Class 1 all the way up to Class 9, Class 10, and specialized categories).
- School Name: Type the formal name or registration code of your current institute (e.g., GHSS 670).
- City / Address: Enter your location (e.g., Pir Mahal or Toba Tek Singh).
- Phone Number: Add an active mobile number for contact records.
- Finalize Account Creation: Review your data, scroll down, and click the blue “Create Account” button.
+-------------------------------------------------------------+
|                     STUDENT REGISTRATION                    |
+-------------------------------------------------------------+
| [Profile Photo Upload] -> Camera / Local File Storage       |
| Name: Muhammad Muddassir                                   |
| Email: alistd123@gmail.com                                  |
| Grade: Class 9  | School: GHSS 670 | City: Pir Mahal        |
+-------------------------------------------------------------+
|                     [ CREATE ACCOUNT ]                      |
+-------------------------------------------------------------+
3. Overcoming Login Challenges: Accessing the Dashboard
Upon hitting create account, a green notification banner will display stating:
“رجسٹریشن کامیاب! براہِ کرم لاگ ان کریں” (Registration Successful! Please Log In).
To log back into your newly minted account:
- Make sure the “STUDENT” tab is actively selected on the main login card.
- Choose “School Students” from the category dropdown.
- Common Troubleshooting Tip: Ensure there are no typos in your email string! It is common to accidentally type default addresses like
alisiroralisardue to browser autofill settings. Always double-check your custom string (e.g.,alistd123@gmail.com) and matching password before clicking “Sign In As Student”.
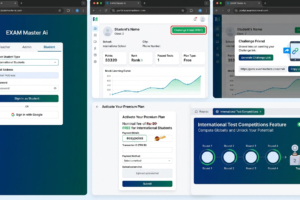
4. Understanding the Student Dashboard: Why It Resembles the Teacher Layout
Once you successfully authenticate, a welcoming screen will briefly flash: “خوش آمدید! ویلکم، ہم خوش آمدید کرتے ہیں آپ کو فری اور دو کلک میں پیپر بدلنے والے پلیٹ فارم پر۔”
Immediately after, you are ushered into the main AI Smart Generator dashboard. At first glance, a student might feel confused because this screen looks almost identical to the master backend layout used by teachers to build examinations. It contains tab options like:
- Papers
- Books
- Notes
- Take Test
Don’t be alarmed! While the visual framework is shared to maintain a uniform portal aesthetic, the student account is heavily restricted. The manual paper generation features do not grant administrative publishing rights. Instead, the absolute core feature for any logged-in student is the dedicated “Take Test” module.
5. Introduction to the Online Testing Control Panel
When you click on the “Take Test” button on the upper dashboard row, the system directs you to the automated evaluation environment, opening up the Control Panel.
This panel acts as a digital exam sheet wrapper where you specify exactly what test you are attempting. The framework requires filling out specific data nodes before the online timer starts:
- Institute Name (Required): Enter the verifying academy or school name.
- Class/Grade & Subject (Required): Lock in the specific course criteria.
- Father’s Name & Residence (Required): For formal data tracking on the digital sheet.
- Book & Chapter Range: Pinpoint exactly which unit or specific chapters you are being evaluated on.
- Question Limits: The dashboard dynamically structures the test based on your selection parameters—such as setting an MCQ count limit (e.g., 10 questions), choosing short question weights, or long question options.
Summary & Upcoming Modules
Because the online testing control panel has an incredibly deep layout with multiple grading mechanisms, timer settings, and automatic marking rules, filling out this control board completely is a massive topic. To ensure you don’t feel overwhelmed, we will cover the actual test-taking process, the grading matrix, and how answers are evaluated by the AI engine in our very next video and blog post module!
Until then, make sure to log into the portal, complete your student registration, and familiarize yourself with the initial layout so you are completely prepared for exam day.
Tag:Automated Online Quiz System, Eduma Student Registration, Exam Master AI Student Login, exammasterai.com portal, How to register as student on exam master, Online Student Testing Pakistan, Online Test Generator for Students, School Exam Online Portal, Student Dashboard Tour, Take Test Exam Master AI